Integrate with Proxmox VE
Support level: Community
What is Proxmox VE
Proxmox Virtual Environment is an open source server virtualization management solution based on QEMU/KVM and LXC. You can manage virtual machines, containers, highly available clusters, storage, and networks with an integrated, easy-to-use web interface or via CLI. Proxmox VE code is licensed under the GNU Affero General Public License, version 3. The project is developed and maintained by Proxmox Server Solutions GmbH.
Requires Proxmox VE 7.0 or newer.
Preparation
The following placeholders are used in this guide:
proxmox.companyis the FQDN of the Proxmox VE server installation.authentik.companyis the FQDN of the authentik installation.
This documentation lists only the settings that you need to change from their default values. Be aware that any changes other than those explicitly mentioned in this guide could cause issues accessing your application.
authentik configuration
To support the integration of Proxmox with authentik, you need to create an application/provider pair in authentik.
Create an application and provider in authentik
- Log in to authentik as an administrator and open the authentik Admin interface.
- Navigate to Applications > Applications and click Create with Provider to create an application and provider pair. (Alternatively you can first create a provider separately, then create the application and connect it with the provider.)
- Application: provide a descriptive name, an optional group for the type of application, the policy engine mode, and optional UI settings.
- Choose a Provider type: select OAuth2/OpenID Connect as the provider type.
- Configure the Provider: provide a name (or accept the auto-provided name), the authorization flow to use for this provider, and the following required configurations.
- Note the Client ID,Client Secret, and slug values because they will be required later.
- Set a
Strictredirect URI to https://proxmox.company:8006. - Select any available signing key.
- Configure Bindings (optional): you can create a binding (policy, group, or user) to manage the listing and access to applications on a user's My applications page.
- Click Submit to save the new application and provider.
Proxmox VE configuration (using the web interface)
-
Log in to the Proxmox VE web interface using an administrative account.
-
Navigate to authentication source settings.
- Go to Datacenter > Permissions > Realms.
- Click Add and select Realm to open the Add Realm dialog.
-
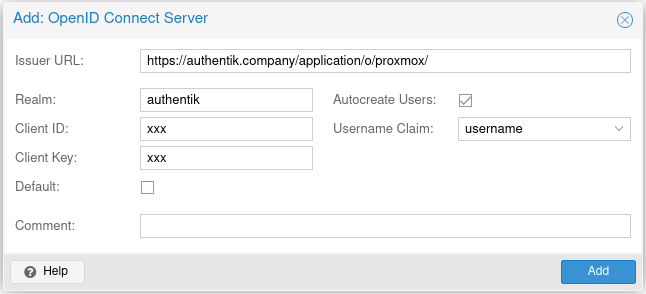
Fill out the OpenID Connect settings.
- In the dialog that appears, fill in the following details:
- Issuer URL: Enter the Issuer URL from authentik (found in your provider's overview tab), e.g.,
https://authentik.company/application/o/proxmox/. - Realm: Enter a name for this authentication source, such as
authentik. - Client ID: Enter the Client ID found on the provider overview page.
- Client Key: Enter the Client Secret. (To find this value click Edit on the Provider overview page.)
- Username claim: Set this to
username. - Autocreate users: Check this box if you want Proxmox to automatically create users upon first login. If checked, users will appear in Proxmox with the format
<authentik username>@authentik. - Default: Check this if you want OpenID Connect to be pre-selected as the default on the login screen.
- Issuer URL: Enter the Issuer URL from authentik (found in your provider's overview tab), e.g.,
Example configuration:
- In the dialog that appears, fill in the following details:
-
Save the configuration.
- Click Add to save the settings.
-
Assign permissions
- After setting up the authentication source, go to Permissions to assign roles and permissions for each user as needed.
-
Logging in
- Users can select this authentication method from the Proxmox login screen, or if set as default, it will be automatically selected.

Proxmox VE configuration (using CLI)
To configure OpenID Connect authentication via the CLI, SSH into any Proxmox cluster node and use the following command:
pveum realm add authentik --type openid --issuer-url https://authentik.company/application/o/proxmox/ --client-id xxx --client-key xxx --username-claim username --autocreate 1