Integrate with Gitea
Support level: Community
What is Gitea
Gitea is a community managed lightweight code hosting solution written in Go. It is published under the MIT license.
Preparation
The following placeholders are used in this guide:
authentik.companyis the FQDN of the authentik installation.gitea.companyis the FQDN of the Gitea installation.
This documentation lists only the settings that you need to change from their default values. Be aware that any changes other than those explicitly mentioned in this guide could cause issues accessing your application.
authentik configuration
To support the integration of Gitea with authentik, you need to create an application/provider pair in authentik.
Create an application and provider in authentik
- Log in to authentik as an admin, and open the authentik Admin interface.
- Navigate to Applications > Applications and click Create with Provider to create an application and provider pair. (Alternatively you can first create a provider separately, then create the application and connect it with the provider.)
- Application: provide a descriptive name, an optional group for the type of application, the policy engine mode, and optional UI settings.
- Choose a Provider type: select OAuth2/OpenID Connect as the provider type.
- Configure the Provider: provide a name (or accept the auto-provided name), the authorization flow to use for this provider, and the following required configurations.
- Note the Client ID,Client Secret, and slug values because they will be required later.
- Set a
Strictredirect URI tohttps://<gitea.company>/user/oauth2/authentik/callback. - Select any available signing key.
- Configure Bindings (optional): you can create a binding (policy, group, or user) to manage the listing and access to applications on a user's My applications page.
- Click Submit to save the new application and provider.
Gitea configuration
- Log in to Gitea as an admin, then click on your profile icon at the top right and select Site Administration.
- Select the Authentication Sources tab and then click on Add Authentication Source.
- Set the following required configurations:
- Authentication Name:
authentik(This must match the name used in the Redirect URI in the previous section) - OAuth2 Provider:
OpenID Connect - Client ID (Key): Enter the Client ID from authentik.
- Client Secret: Enter the Client Secret from authentik.
- Icon URL:
https://authentik.company/static/dist/assets/icons/icon.png - OpenID Connect Auto Discovery URL:
https://authentik.company/application/o/<slug>/.well-known/openid-configuration - Additional Scopes:
email profile
- Authentication Name:
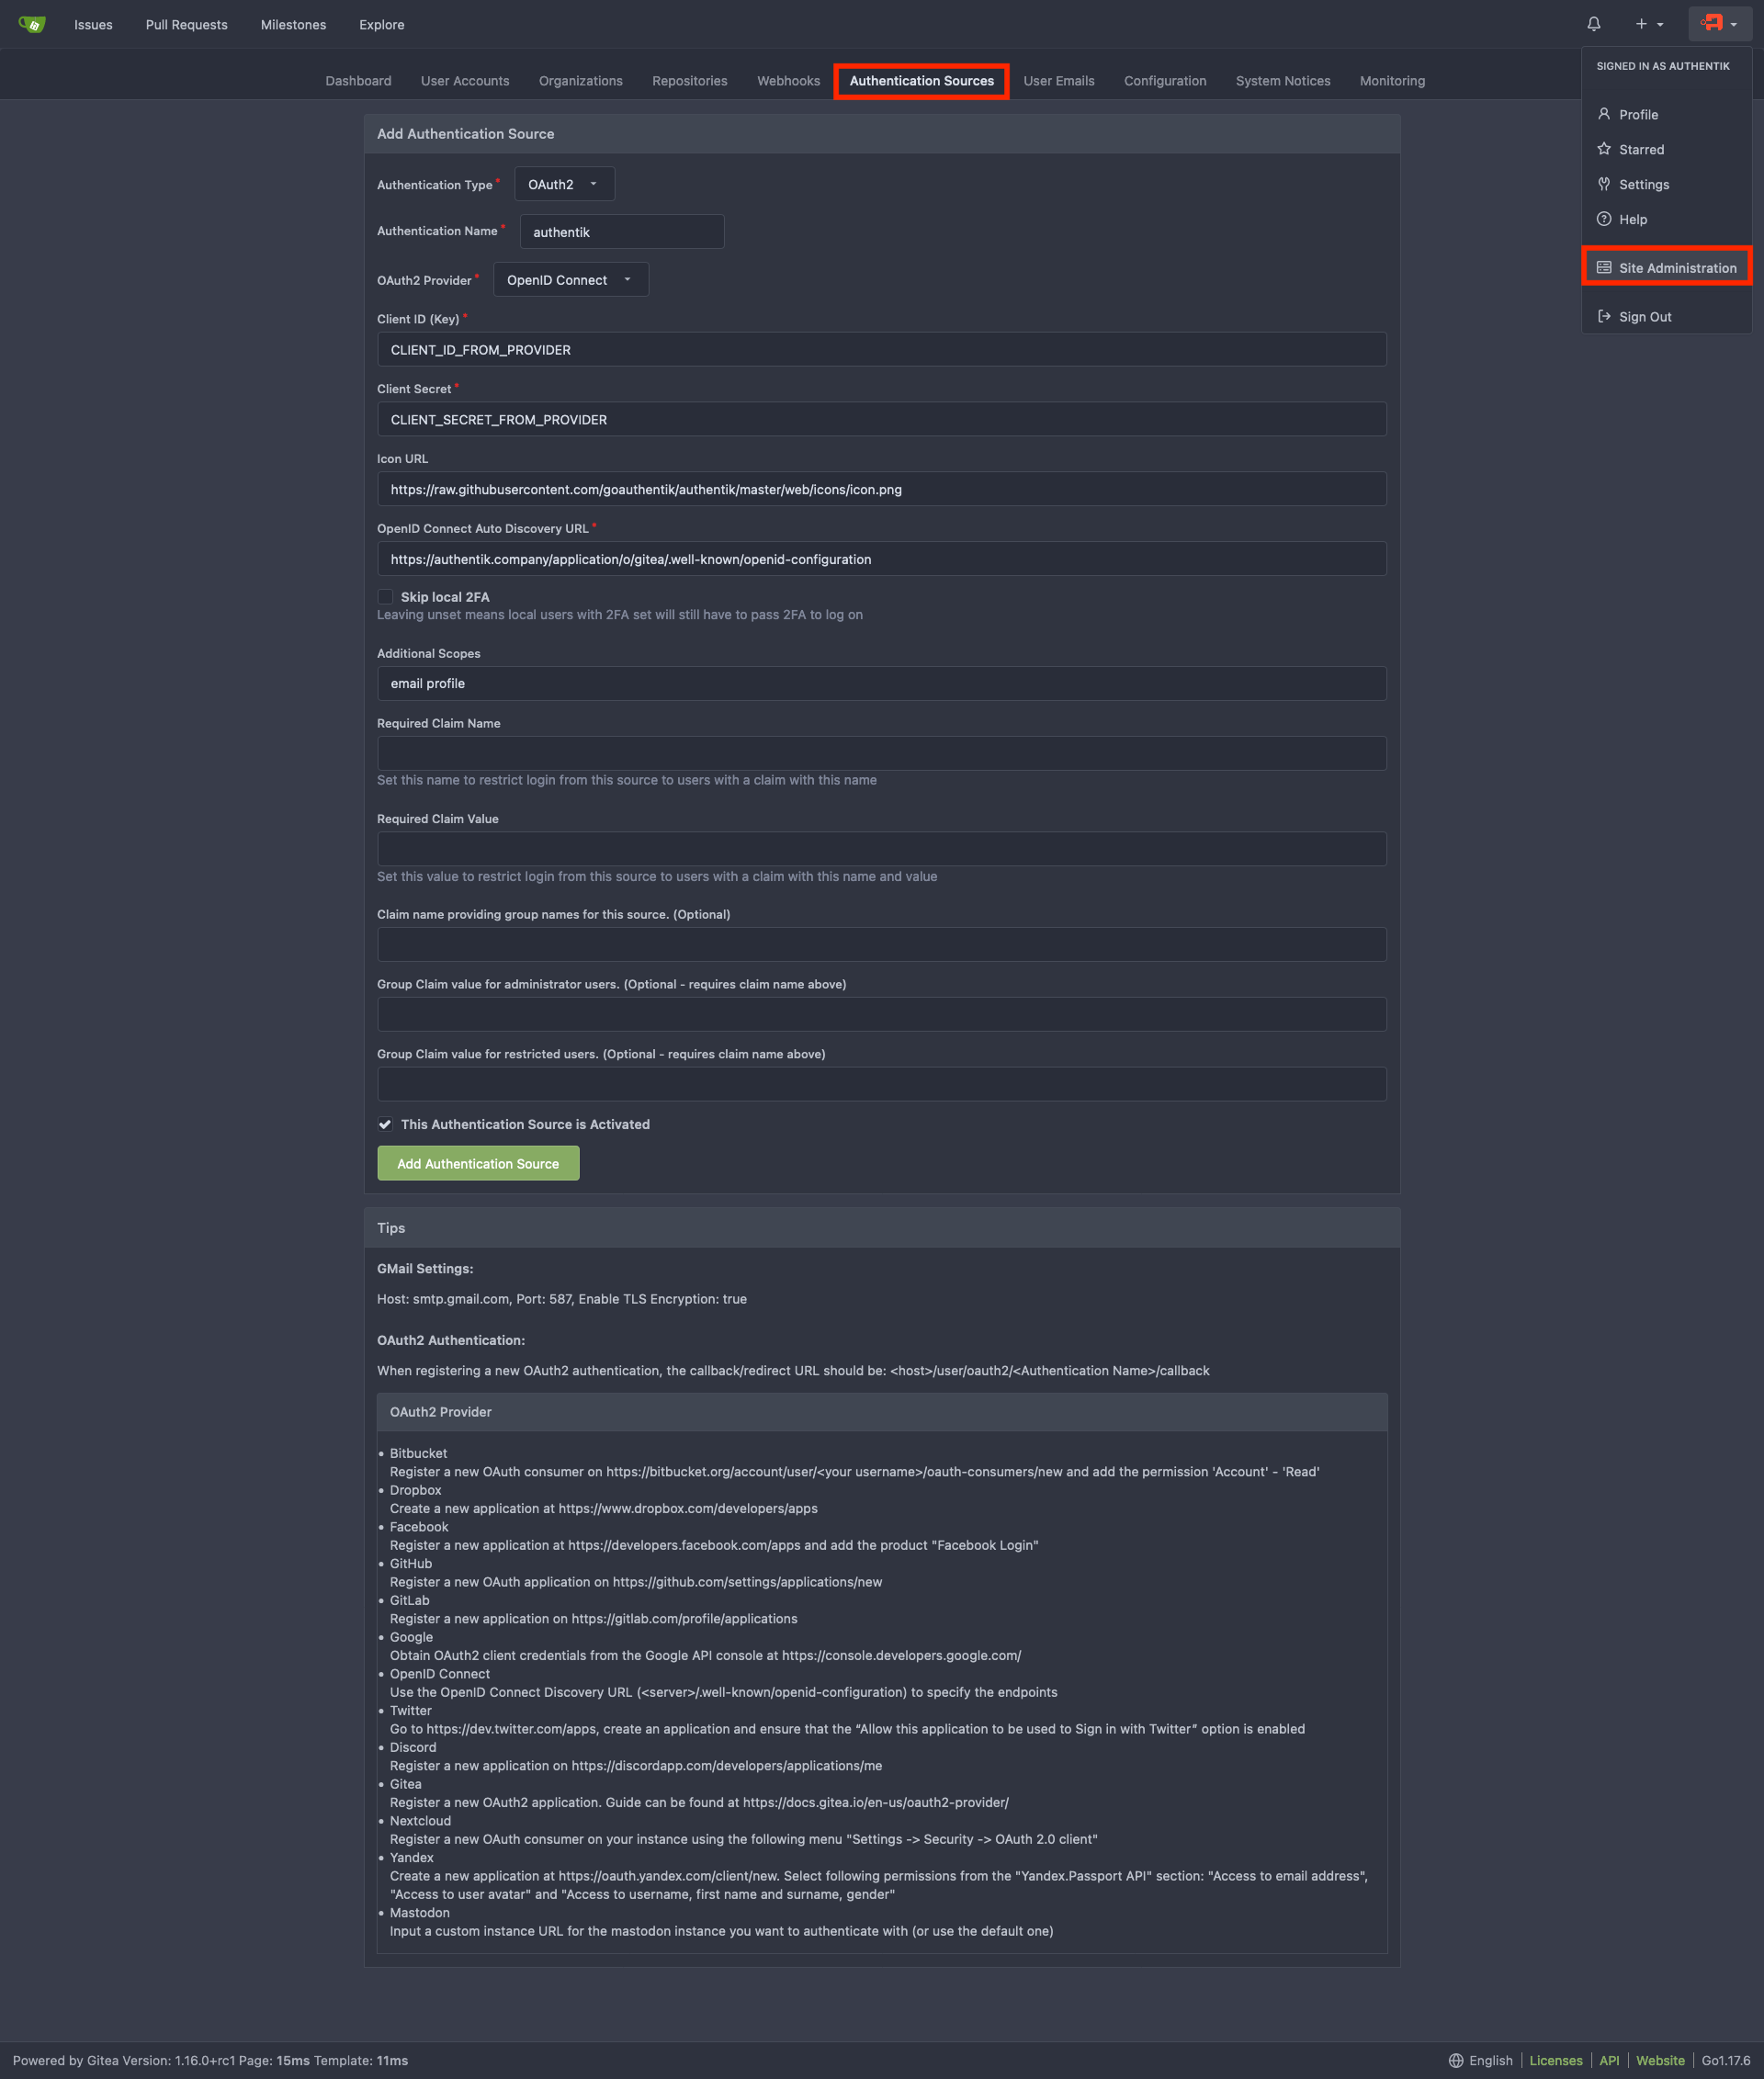
- Click Add Authentication Source.
Claims for authorization management (optional)
This step is optional and shows how to set claims to control the permissions of users in Gitea by adding them to groups.
Create groups
The following groups will be created:
gituser: normal Gitea users.gitadmin: Gitea users with administrative permissions.gitrestricted: restricted Gitea users.
Users who are in none of these groups will not be able to log in to gitea.
- Log in to authentik as an administrator, and open the authentik Admin interface.
- Navigate to Directory > Groups and click Create.
- Set the group name to
gituserand click Create. - Repeat steps 2 and 3 to create two additional groups named
gitadminandgitrestricted. - Click the name of a newly created group and navigate to the Users tab.
- Click Add existing user, select the user/s that need Gitea access and click Add.
- Repeat steps 5 and 6 for the two additional groups.
You can add users to the groups at any point.
Create custom property mapping
-
Log in to authentik as an admin, and open the authentik Admin interface.
-
Navigate to Customization > Property Mappings and click Create. Create a Scope Mapping with the following configurations:
- Name: Choose a descriptive name (.e.g
authentik gitea OAuth Mapping: OpenID 'gitea') - Scope name:
gitea - Expression:
gitea_claims = {}

if request.user.ak_groups.filter(name="gituser").exists():
    gitea_claims["gitea"]= "user"
if request.user.ak_groups.filter(name="gitadmin").exists():
    gitea_claims["gitea"]= "admin"
if request.user.ak_groups.filter(name="gitrestricted").exists():
    gitea_claims["gitea"]= "restricted"

return gitea_claims - Name: Choose a descriptive name (.e.g
-
Click Finish.
Add the custom property mapping to the Gitea provider
-
Log in to authentik as an admin, and open the authentik Admin interface.
-
Navigate to Applications > Providers and click on the Edit icon of the Gitea provider.
-
Under Advanced protocol settings > Scopes add the following scopes to Selected Scopes:
authentik default OAuth Mapping: OpenID 'email'authentik default OAuth Mapping: OpenID 'profile'authentik default OAuth Mapping: OpenID 'openid'authentik gitea OAuth Mapping: OpenID 'gitea'
-
Click Update.
Configure Gitea to use the new claims
For this to function, the Gitea ENABLE_AUTO_REGISTRATION: true variable must be set. More information on configurations variables in the Gitea Configuration Cheat Sheet.
- Log in to Gitea as an admin. Click on your profile icon at the top right > Site Administration.
- Select the Authentication Sources tab and edit the authentik Authentication Source.
- Set the following configurations:
- Additional Scopes:
email profile gitea - Required Claim Name:
gitea - Claim name providing group names for this source. (Optional):
gitea - Group Claim value for administrator users. (Optional - requires claim name to be set):
admin - Group Claim value for restricted users. (Optional - requires claim name to be set):
restricted
- Additional Scopes:
- Click Update Authentication Source.
Users who are not part of any defined group will be denied login access.
In contrast, members of the gitadmin group will have full administrative privileges, while those in the gitrestricted group will have limited access.
Helm Chart Configuration
authentik authentication can be configured automatically in Kubernetes deployments using its Helm chart.
Add the following to your Gitea Helm chart values.yaml file:
gitea:
    oauth:
        - name: "authentik"
        provider: "openidConnect"
        key: "<Client ID from authentik>"
        secret: "<Client secret from authentik>"
        autoDiscoverUrl: "https://authentik.company/application/o/<slug>/.well-known/openid-configuration"
        iconUrl: "https://authentik.company/static/dist/assets/icons/icon.png"
        scopes: "email profile"
Kubernetes Secret
You can also utilize a Kubernetes Secret object to store and manage the sensitive key and secret values.
- Create a Kubernetes secret with the following variables:
apiVersion: v1
kind: Secret
metadata:
    name: gitea-authentik-secret
type: Opaque
stringData:
    key: "<Client ID from authentik>"
    secret: "<Client secret from authentik>"
- Add the following configurations to your Gitea Helm Chart
values.yamlfile:
gitea:
    oauth:
        - name: "authentik"
        provider: "openidConnect"
        existingSecret: gitea-authentik-secret
        autoDiscoverUrl: "https://authentik.company/application/o/<slug>/.well-known/openid-configuration"
        iconUrl: "https://authentik.company/static/dist/assets/icons/icon.png"
        scopes: "email profile"
Resources
Configuration verification
To verify that authentik is correctly set up with Gitea, log out and then log back in using the Sign in with authentik button.