GitHub Enterprise Server
What is GitHub Enterprise Server
GitHub Enterprise Server is a self-hosted platform for software development within your enterprise. Your team can use GitHub Enterprise Server to build and ship software using Git version control, powerful APIs, productivity and collaboration tools, and integrations. Developers familiar with GitHub.com can onboard and contribute seamlessly using familiar features and workflows.
-- https://docs.github.com/en/enterprise-server@3.5/admin/overview/about-github-enterprise-server
Preparation
The following placeholders will be used:
https://github.companyis your GitHub Enterprise Server installationauthentik.companyis the FQDN of the authentik InstallGitHub Usersis an authentik group used for holding GitHub users.GitHub Adminsis an authentik group used for indicating GitHub administrators.
First, create the two groups, in authentik, go to Groups, click Create and put in GitHub Users, or your chosen user group name. Repeat this step with your Admin group as well.
Create a SAML provider with the following parameters:
- ACS URL:
https://github.company/saml/consume - Audience:
https://github.company - Issuer:
https://github.company - Binding:
Post
Under Advanced protocol settings, set a certificate for Signing Certificate.
Once the provider is created, it is advised to download the signing certificate as you will need it later.
Create a matching application for your SAML provider.
SAML Configuration
If you are planning to use SCIM, (available from GHES 3.14.0) you should create a first admin user on your instance and go to your personal access tokens at https://github.company/settings/tokens/new, click Generate new token and click Generate new token (classic). Your token should have a descriptive name and ideally, no expiration date. For permission scopes, you need to select admin:enterprise. Click Generate token and store the resulting token in a safe location.
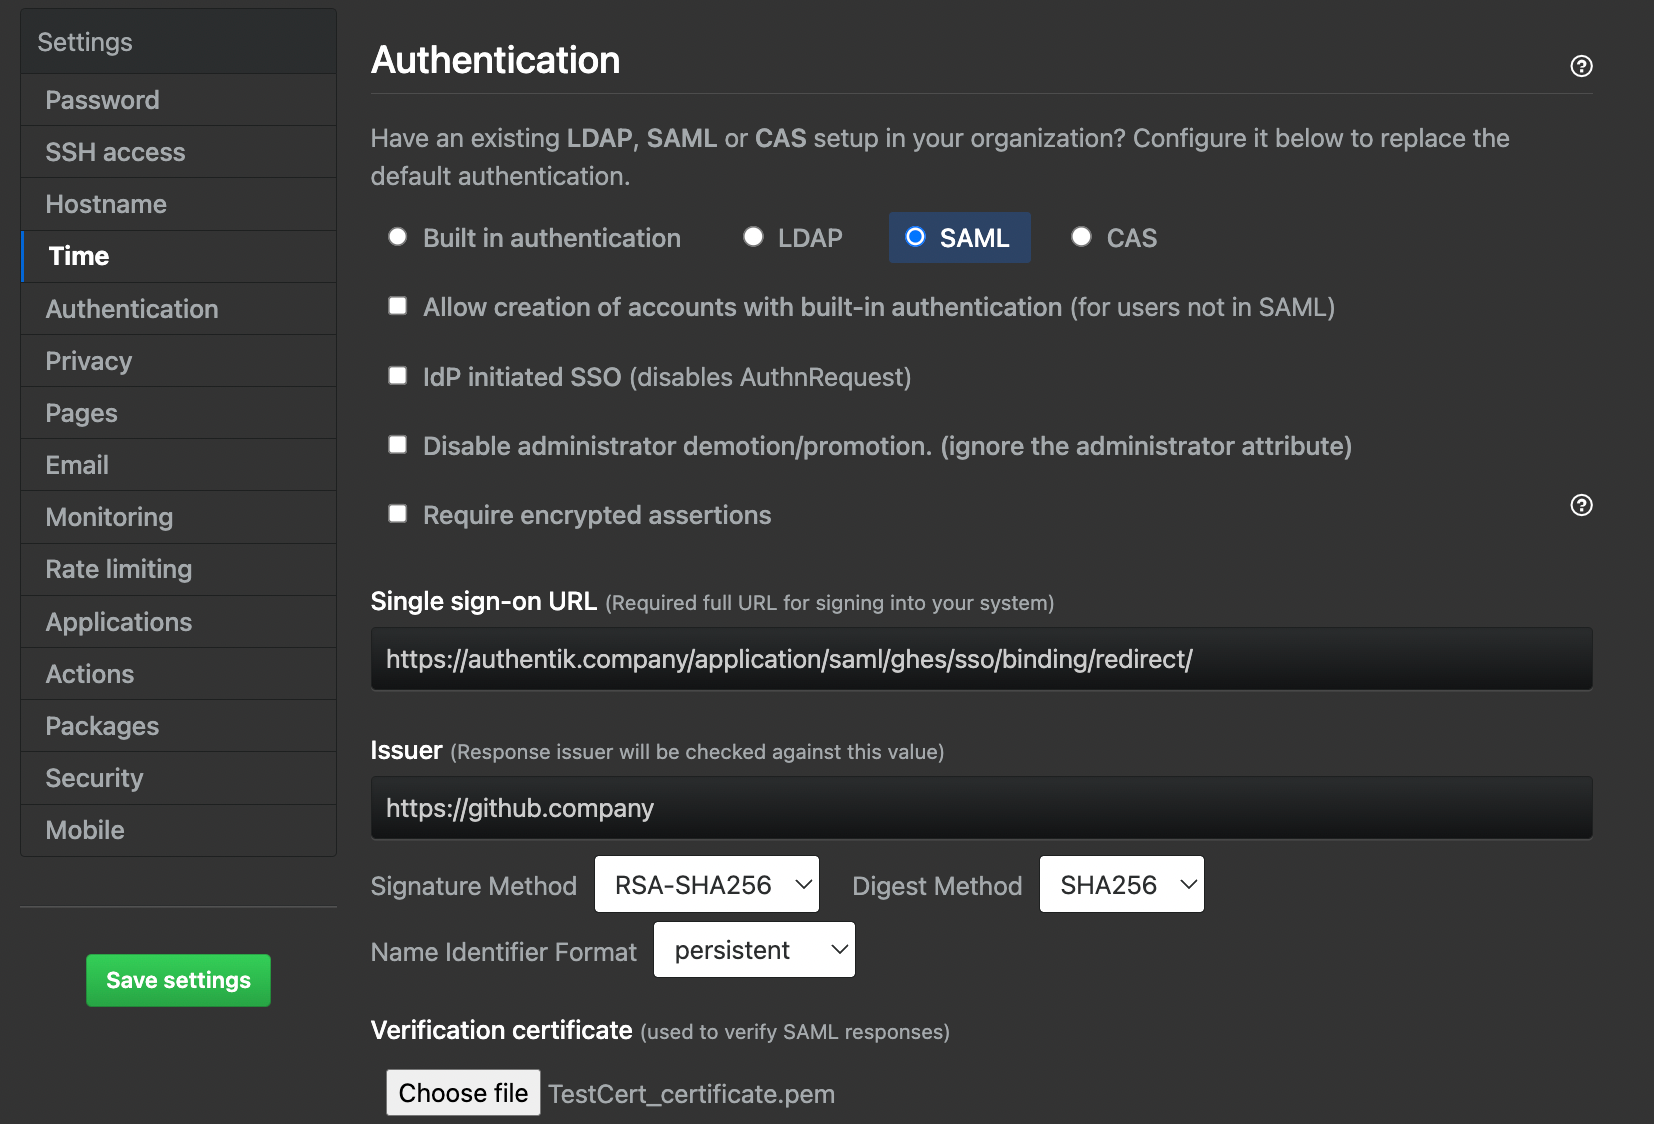
To enable SAML, navigate to your appliance maintenance settings. These are found at https://github.company:8443. Here, sign in with an administrator user and go to the Authentication section.
On this page:
- Select the SAML option.
- In Sign on URL, input your SSO URL (Redirect) from authentik.
- For Issuer, use the Audience you set in authentik.
- Verify that the Signature method and Digest method match your SAML provider settings in authentik.
- For Validation certificate, upload the signing certificate you downloaded after creating the provider.
- If you plan to enable SCIM, select Allow creation of accounts with built-in authentication and Disable administrator demotion/promotion options. These are selected so you can use your admin user as an emergency non-SSO account, as well as create machine users, and to ensure users are not promoted outside your IdP.
- In the User attributes section, enter
http://schemas.xmlsoap.org/ws/2005/05/identity/claims/emailaddressin the Username field to ensure the emails become normalized into usernames in GitHub. - Press Save settings on the left-hand side and wait for the changes to apply.
Once the appliance has saved the settings and reloaded the services, you should be able to navigate to your instance URL at https://github.company and sign in with SAML.
SCIM Configuration
This section only applies if you have taken the steps prior to prepare the instance for SCIM enablement.
After enabling SAML, log into your initial admin account again. Click the user portrait in tee top right, click Enterprise settings, click Settigs in the left-hand sidebar, click Authentication security. On this page you have to check Enable SCIM configuration and press Save. After which you should get a message reading SCIM Enabled.
Before we create a SCIM provider, we have to create a new Property Mapping. In authentik, go to Customization, then Property Mappings. Here, click Create, select SCIM Provider Mapping. Name the mapping something memorable and paste the following code in the Expression field:
roles = []
# Edit this if statement if you need to add more GitHub roles.
# Valid roles include:
# user, guest_collaborator, enterprise_owner, billing_manager
if ak_is_group_member(request.user, name='GitHub Admins'):
    roles.append({'value': 'enterprise_owner', 'primary': True})
else:
    roles.append({'value': 'user', 'primary': True})

return {
    "roles": roles,
}
If you named your group anything other than GitHub Admins, please ensure you change it in the code above.
Create a new SCIM provider with the following parameters:
- URL:
https://github.company/api/v3/scim/v2 - Token: Paste the token you generated earlier here.
- In the User filtering section, you can select your
GitHub Usersgroup. - In the Attribute mapping section, de-select the
authentik default SCIM Mapping: Usermapping from the User Property Mappings by selecting it on the right-hand side and clicking the left-facing single chevron. - Select the property mapping you created in the previous step and add it by clicking the right-facing single chevron.
- Ensure that
authentik default SCIM Mapping: Groupis the only one active in the Group Property Mappings. - Click Finish.
Go back to your GitHub Enterprise Server Application created in the first step and add your new SCIM provider in the Backchannel Providers field, then click the Update button.
You should now be ready to assign users to your GitHub Users and GitHub Admins groups, which will be provisioend by the SCIM provisioner. If you do not see your users being provisioned, go to your SCIM provider and click the Run sync again option. A few seconds later, you should see results of the SCIM sync.