Integrate with GitHub Enterprise Cloud - Enterprise Managed Users
Support level: Community
What is GitHub Enterprise Cloud - Enterprise Managed Users
With Enterprise Managed Users, you manage the lifecycle and authentication of your users on GitHub from an external identity management system, or IdP:
- Your IdP provisions new user accounts on GitHub, with access to your enterprise.
- Users must authenticate on your IdP to access your enterprise's resources on GitHub.
- You control usernames, profile data, organization membership, and repository access from your IdP.
- If your enterprise uses OIDC SSO, GitHub will validate access to your enterprise and its resources using your IdP's Conditional Access Policy (CAP). See "About support for your IdP's Conditional Access Policy."
- Managed user accounts cannot create public content or collaborate outside your enterprise. See "Abilities and restrictions of managed user accounts."
Preparation
The following placeholders are used in this guide:
github.com/enterprises/foois your GitHub organization, wherefoois the name of your enterpriseauthentik.companyis the FQDN of the authentik installation.GitHub Usersis an authentik group used for holding GitHub users.GitHub Adminsis an authentik group used for indicating GitHub administrators.
This documentation lists only the settings that you need to change from their default values. Be aware that any changes other than those explicitly mentioned in this guide could cause issues accessing your application.
authentik configuration
To support the integration of GitHub Enterprise Cloud EMU with authentik, you need to create an application/provider pair in authentik.
In order to use GitHub Enterprise Cloud EMU, SCIM must also be set up.
GitHub will create usenames for your EMU users based on the SAML NameID property which must also match SCIM's _userName_ attribute.
Create an application and provider in authentik
- Log in to authentik as an administrator and open the authentik Admin interface.
- Navigate to Applications > Applications and click Create with Provider to create an application and provider pair. (Alternatively you can first create a provider separately, then create the application and connect it with the provider.)
- Application: provide a descriptive name, an optional group for the type of application, the policy engine mode, and optional UI settings.
- Choose a Provider type: select SAML Provider as the provider type.
- Configure the Provider: provide a name (or accept the auto-provided name), the authorization flow to use for this provider, and the following required configurations.
- Set the ACS URL to
https://github.com/enterprises/foo/saml/consume. - Set the Audience to
https://github.com/enterprises/foo. - Set the Issuer to
https://github.com/enterprises/foo. - Set the Service Provider Binding to
Post. - Under Advanced protocol settings, select an available signing certificate. It is advised to download this certificate as it will be required later. It can be found under System > Certificates in the Admin Interface.
- Under NameID Property Mapping, set NameID Property Mapping to be based on the
Emailfield.
- Set the ACS URL to
- Configure Bindings (optional): you can create a binding (policy, group, or user) to manage the listing and access to applications on a user's My applications page.
- Click Submit to save the new application and provider.
Create the users and administrator groups
In the authentik Admin Interface, navigate to Directory > Groups and click Create. Set the group's name, any other desired settings, and click Create. Repeat this step twice: Once for the users group and once for the administrator group.
After creating the groups, select a group, navigate to the Users tab, and manage its members by using the Add existing user and Create user buttons as needed.
GitHub SAML Configuration
When your EMU is provisioned by GitHub, you will receive an email inviting you reset the password of your 'setup user'. This user cannot be linked with SSO and is an emergency access account, as it will be the only account that can bypass SSO requirements.
Before enabling SAML, go to your Personal access tokens on your EMU setup user and Generate a new personal access token (classic). This should have a descriptive note like SCIM Token. It is advisable to set this to not expire. For scopes, select only admin:enterprise and click Generate token.
Copy the resulting token to a safe location.
After you have set a password for this account and generated your SCIM token, navigate to your enterprise settings by clicking your GitHub user portrait in the top right of GitHub.com, select Your enterprise, click the Settings link, then click Authentication security.
On this page:
- Select the
Require SAML authenticationcheckbox. - In
Sign on URL, input the SSO URL (Redirect) entry from the SAML provider you created. - For
Issuer, input theIssueryou set in authentik - For
Public certificate, paste the full signing certificate into this field. - Verify that the
Signature methodandDigest methodmatch your SAML provider settings in authentik.
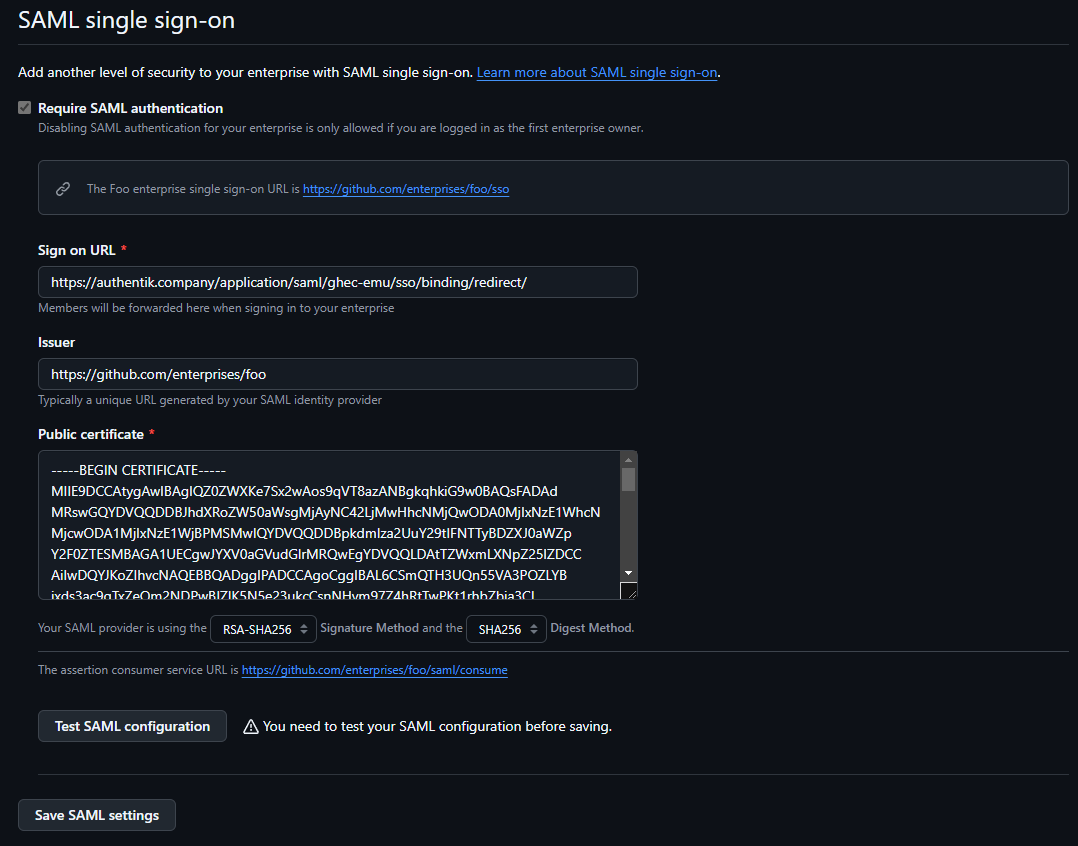
Once these fields are populated, you can use the Test SAML configuration button to test the authentication flow. If the flow completes successfully, you will see a green tick next to the Test button.
Scroll down to hit the Save SAML settings button below.
You will now be prompted to save your SAML recovery codes, these will be necessary if you need to disable or change your SAML settings, so keep them safe!
SCIM Provider
Before we create a SCIM provider, we also have to create a new Property Mapping. In authentik, go to Customization, then Property Mappings. Here, click Create, select SCIM Provider Mapping. Name the mapping something memorable and paste the following code in the Expression field:
roles = []
# Edit this if statement if you need to add more GitHub roles.
# Valid roles include:
# user, guest_collaborator, enterprise_owner, billing_manager
if ak_is_group_member(request.user, name='GitHub Admins'):
    roles.append({'value': 'enterprise_owner', 'primary': True})
else:
    roles.append({'value': 'user', 'primary': True})
return {
    "roles": roles,
}
If you named your group anything other than GitHub Admins, please ensure you change it in the code above.
Create a new SCIM provider with the following parameters:
- URL:
https://api.github.com/scim/v2/enterprises/foo/(Replacingfoowith your Enterprise slug.) - Token: Paste the token provided from GitHub here.
- In the User filtering section, you can select your
GitHub Usersgroup. - In the Attribute mapping section, de-select the
authentik default SCIM Mapping: Usermapping by selecting it on the right-hand side and clicking the left-facing single chevron. - Select the property mapping you created in the previous step and add it by clicking the right-facing single chevron.
- You can leave the Group Property Mappings as is.
- Click Finish.
Go back to your GitHub EMU Application created in the first step and add your new SCIM provider in the Backchannel Providers field, then click the Update button.
You should now be ready to assign users to your GitHub Users and GitHub Admins groups, which will be provisioend by the SCIM provisioner. If you do not see your users being provisioned, go to your SCIM provider and click the Run sync again option. A few seconds later, you should see results of the SCIM sync.